Introduction
Welcome back to our hands-on Terraform series! In Part 1, you set up Terraform, configured AWS credentials, and prepared your project structure. Now comes the exciting part—writing Terraform configuration to define and deploy real AWS infrastructure.
By the end of this post, you'll understand every line of code in a complete Terraform project. More importantly, you'll understand the AWS concepts behind the code: what EC2 instances are, how VPCs work, why security groups matter, and how all these components fit together.
🎯 What You'll Learn in Part 2:
- Creating and understanding
main.tf(Terraform core configuration) - Defining variables in
variables.tffor flexibility - Querying AWS resources with
data.tf(data sources) - Configuring security with
security.tf(security groups) - Creating EC2 instances with
ec2.tf - Exposing values with
outputs.tf - AWS Fundamentals: EC2, VPC, subnets, AMIs, availability zones
- Networking Concepts: Security groups, ingress/egress, CIDR blocks
- Best Practices: Configuration organization and naming conventions
Prerequisites:
- Completed Part 1 (Terraform and AWS CLI installed and configured)
- Text editor or IDE (VS Code, nano, vim, etc.)
- Basic understanding of YAML/JSON-like syntax
- Your
terraform-practicedirectory ready
Series Progress:
- Part 1: ✅ Installation and AWS setup (completed)
- Part 2: 📍 Configuration files and resources (current)
- Part 3: ⏭️ Terraform workflow and state management (next)
Understanding Terraform Configuration Files
Before diving into code, let's understand how Terraform configuration files work together:
The Configuration File System
Terraform uses files with the .tf extension written in HashiCorp Configuration Language (HCL). HCL is designed to be:
- Human-readable and writable
- Declarative (describe what you want, not how to create it)
- Expressive yet simple
- Similar to JSON but more concise
File Naming Conventions
| File Name | Purpose | Required? |
|---|---|---|
main.tf | Primary configuration, providers, core settings | Convention (not required) |
variables.tf | Variable definitions for parameterization | No, but best practice |
outputs.tf | Output values to display or use elsewhere | No, but highly recommended |
data.tf | Data source queries (existing resources) | No, organizational choice |
*.tf | Any name works (security.tf, ec2.tf, etc.) | No, use descriptive names |
💡 Important: Terraform reads all .tf files in a directory and treats them as one configuration. File names are purely for organization—you could put everything in one file, but splitting by purpose improves maintainability.
Our Project Structure
For this tutorial, we'll create six configuration files:
terraform-practice/
├── main.tf          # Terraform and provider configuration
├── variables.tf     # Variable definitions
├── data.tf          # Data source queries
├── security.tf      # Security group rules
├── ec2.tf           # EC2 instance definition
└── outputs.tf       # Output values
Creating main.tf: Core Configuration
Let's create our first configuration file. This defines which version of Terraform we require and which providers (AWS) we'll use.
Create the file:
touch main.tf
Add the following content:
terraform {
    required_version = ">= 1.0"
    required_providers {
        aws = {
            source = "hashicorp/aws"
            version = "~> 5.0"
        }
    }
}

provider "aws" {
    region = var.aws_region
}
Line-by-Line Explanation
Line 1: terraform {
- Begins the
terraformconfiguration block - This block contains settings for Terraform itself (not cloud resources)
- Every Terraform project should have this block
Line 2: required_version = ">= 1.0"
- Specifies minimum Terraform version required
>=means "greater than or equal to"1.0ensures we have modern Terraform features- Prevents errors if someone uses an older version
✅ Why version constraints matter: If your configuration uses features from Terraform 1.0+, running it with 0.15 would fail. Version constraints catch this early with a clear error message.
Line 3: required_providers {
- Begins the providers configuration section
- Providers are plugins that let Terraform interact with APIs
- Each provider handles a specific platform (AWS, Azure, GCP, etc.)
Line 4-7: AWS Provider Configuration
aws = {
    source = "hashicorp/aws"
    version = "~> 5.0"
}
Let's break down each setting:
| Setting | Value | Meaning |
|---|---|---|
aws | Local name for provider | How we'll reference this provider in our code |
source | "hashicorp/aws" | Where to download the provider (Terraform Registry) |
version | "~> 5.0" | Any version 5.x (but not 6.0 or higher) |
How to Verify Provider Source on Terraform Registry
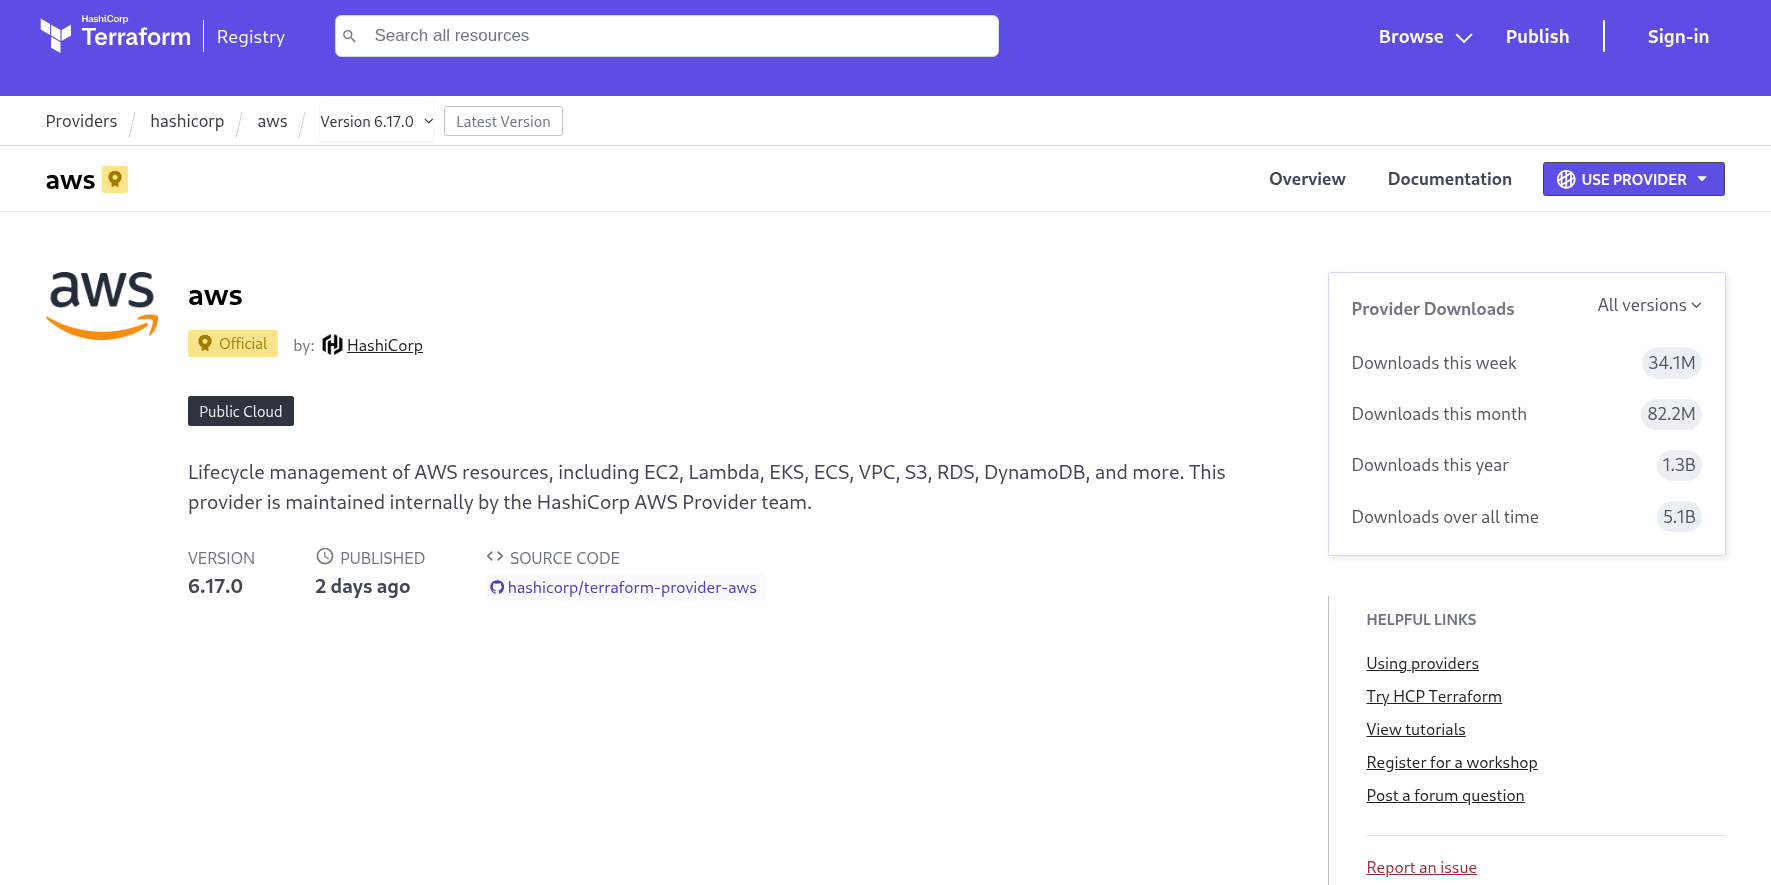
The source = "hashicorp/aws" line tells Terraform where to download the AWS provider plugin. Let's learn how to verify and explore this provider on the official Terraform Registry website.
Step-by-Step: Navigating the Terraform Registry
Step 1: Visit the Terraform Registry
- Open your browser and go to: https://registry.terraform.io
- This is the official registry for Terraform providers and modules
Step 2: Search for the AWS Provider
- In the search bar at the top, type "aws"
- Click on "hashicorp/aws" from the results
- Or directly visit: https://registry.terraform.io/providers/hashicorp/aws/latest
Step 3: Understanding the Provider Page
When you land on the AWS provider page, you'll see several important sections:
| Section | What You'll Find | Why It Matters |
|---|---|---|
| Overview | Provider description, usage examples | Quick introduction to provider capabilities |
| Documentation | Complete reference for all resources | Every AWS resource type you can create |
| Versions | All available versions with changelogs | See what's new, check compatibility |
| Resources | List of all AWS resources (EC2, S3, etc.) | Browse available resource types |
| Data Sources | Query existing AWS resources | Learn what data you can fetch |
Step 4: Finding Specific Resource Documentation
Let's say you want to learn more about the aws_instance resource we're using:
- On the provider page, click "Documentation" in the left sidebar
- Scroll down to "Resources" section
- Find and click "aws_instance"
- You'll see:
- Complete list of arguments (required and optional)
- Attribute references (values you can access)
- Example configurations
- Import instructions
Step 5: Checking Version Information
To see available versions:
- Click the "Versions" tab near the top
- You'll see all published versions (e.g., 5.82.0, 5.81.0, 5.80.0...)
- Click any version to see:
- Release date
- Changelog (what changed in this version)
- Provider configuration for that specific version
Understanding the Source Format
The source "hashicorp/aws" follows this format:
[namespace]/[provider-name]
- Namespace:
hashicorp- The organization that maintains the provider - Provider Name:
aws- The cloud platform or service
Other Provider Examples:
| Provider Source | Platform | Registry URL |
|---|---|---|
hashicorp/azurerm | Microsoft Azure | registry.terraform.io/providers/hashicorp/azurerm |
hashicorp/google | Google Cloud Platform | registry.terraform.io/providers/hashicorp/google |
hashicorp/kubernetes | Kubernetes | registry.terraform.io/providers/hashicorp/kubernetes |
mongodb/mongodbatlas | MongoDB Atlas | registry.terraform.io/providers/mongodb/mongodbatlas |
💡 Pro Tip: When starting with a new provider, always check the Terraform Registry first. The documentation is comprehensive and includes practical examples for every resource type.
Understanding ~> 5.0 (Pessimistic Version Constraint):
~>means "approximately greater than"~> 5.0allows5.1,5.2,5.99but not6.0- This gets bug fixes and features but prevents breaking changes
- Also called the "twiddle-wakka" operator
Line 11-13: Provider Configuration Block
provider "aws" {
    region = var.aws_region
}
| Component | Explanation |
|---|---|
provider "aws" | Configures the AWS provider with specific settings |
region = var.aws_region | Which AWS region to use (from variable) |
var.aws_region | References a variable (we'll define it shortly) |
How authentication works:
- Terraform uses AWS credentials from
~/.aws/credentials(configured in Part 1) - No need to specify credentials in code (security best practice)
- Provider automatically uses the credentials from AWS CLI configuration
Creating variables.tf: Flexible Configuration
Variables make your Terraform configuration reusable and flexible. Instead of hard-coding values, you define variables that can be changed without modifying the code.
Create the file:
touch variables.tf
Add the following content:
variable "aws_region" {
    description = "AWS region for resources"
    type = string
    default = "us-east-1"
}

variable "instance_type" {
    description = "EC2 instance type"
    type = string
    default = "t2.micro"
}

variable "key_name" {
    description = "AWS key pair name for EC2 access"
    type = string
    default = "my-terraform-key"
}

variable "environment" {
    description = "Environment name"
    type = string
    default = "dev"
}
Understanding Variable Blocks
Each variable block follows this structure:
variable "name" {
    description = "Human-readable explanation"
    type        = data_type
    default     = default_value
}
Let's examine each variable:
Variable 1: aws_region
variable "aws_region" {
    description = "AWS region for resources"
    type = string
    default = "us-east-1"
}
| Attribute | Value | Purpose |
|---|---|---|
| Name | aws_region | Identifies this variable in code |
| Description | "AWS region for resources" | Documentation for users |
| Type | string | Text value (e.g., "us-east-1") |
| Default | "us-east-1" | Value if not specified elsewhere |
Why this matters: Different regions have different:
- Pricing (us-east-1 is often cheapest)
- Available services and features
- Compliance requirements (data locality laws)
- Latency to end users
Understanding AWS Regions
AWS regions are physically separate geographic locations containing data centers. Each region:
| Region Code | Location | Common Use Cases |
|---|---|---|
us-east-1 | N. Virginia, USA | Largest, most services, cheapest |
us-west-2 | Oregon, USA | West coast applications |
eu-west-1 | Ireland | European users, GDPR compliance |
ap-southeast-1 | Singapore | Asian Pacific users |
AWS Console Perspective: How to Manually Provision Infrastructure
Before diving deeper into Terraform, let's understand how you would provision the same infrastructure manually through the AWS Console. This helps you appreciate what Terraform automates and understand the AWS fundamentals.
Accessing the AWS Console
- Open your browser and navigate to: https://console.aws.amazon.com
- Sign in with your AWS account credentials
- You'll land on the AWS Management Console homepage
Step 1: Selecting Your Region in AWS Console
The first critical step when working with AWS is selecting the correct region:
How to Select a Region:
- Look at the top-right corner of the AWS Console
- You'll see a dropdown showing your current region (e.g., "N. Virginia" or "us-east-1")
- Click on it to see all available regions
- Select your preferred region (e.g., "US East (N. Virginia)" for us-east-1)
⚠️ Important: Resources you create are region-specific! If you create an EC2 instance in us-east-1 and then switch to us-west-2, you won't see that instance. Always verify you're in the correct region.
How to View All Regions and Their Details:
- Click on the region dropdown in the console
- You'll see region names like:
- US East (N. Virginia) -
us-east-1 - US West (Oregon) -
us-west-2 - Europe (Ireland) -
eu-west-1 - Asia Pacific (Singapore) -
ap-southeast-1
- US East (N. Virginia) -

Step 2: Exploring EC2 Instance Types in AWS Console
To understand and select instance types through the console:
Navigate to EC2 Dashboard:
- In the AWS Console, search for "EC2" in the top search bar
- Click on "EC2" to open the EC2 Dashboard
- In the left sidebar, click "Instance Types" under "Instances"
Exploring Instance Types:
You'll see a searchable list of all available instance types. Here's what you can do:
| Action | How to Do It | What You'll Learn |
|---|---|---|
| Search by name | Type "t2.micro" in the search box | Find specific instance types quickly |
| Filter by family | Use filters to show only T2, T3, M5, etc. | Compare instances in same family |
| View specifications | Click on any instance type | vCPUs, Memory, Network performance |
| Check pricing | Click "On-Demand Pricing" link | Cost per hour for each instance type |
Example: Viewing t2.micro Details:
- Search for "t2.micro" in the Instance Types page
- Click on "t2.micro" to see details:
- vCPUs: 1
- Memory: 1 GiB
- Instance Storage: EBS only
- Network Performance: Low to Moderate
- Free Tier Eligible: Yes
Step 3: Launching an EC2 Instance Manually (Console Walkthrough)
Let's walk through manually creating the same EC2 instance that our Terraform code provisions:
Launch Instance Wizard:
- From EC2 Dashboard, click the orange "Launch Instance" button
- You'll go through these steps:
Step 1: Name and Tags
- Name: Enter "terraform-lab-instance" (or any name you prefer)
- Tags: These are the same as the
tagsblock in our Terraform code- Click "Add additional tags" to add Environment, CreatedBy, etc.
Step 2: Application and OS Images (Amazon Machine Image)
This is where you select the AMI - remember our data.aws_ami data source in Terraform:
- Quick Start: AWS provides popular AMIs here
- Find Amazon Linux 2:
- Look for "Amazon Linux 2 AMI (HVM) - Kernel 5.10"
- Architecture: 64-bit (x86)
- This matches our data source filter:
amzn2-ami-hvm-*-x86_64-gp2
How to Find the AMI ID:
- The AMI ID is shown under the AMI name (e.g.,
ami-0abcdef1234567890) - This ID is what Terraform retrieves with
data.aws_ami.amazon_linux.id - Note: AMI IDs are different in each region!
💡 Terraform vs Manual: In the console, you manually browse and select an AMI. In Terraform, the data source automatically finds the latest AMI matching your criteria, ensuring you always use the most up-to-date and secure version.
Step 3: Instance Type
This corresponds to var.instance_type in our Terraform:
- Default selection: Usually t2.micro or t3.micro
- Change instance type: Click "All instance types" to see the full list
- For our tutorial: Select "t2.micro" (Free tier eligible)
- You'll see:
- 1 vCPU
- 1 GiB Memory
- Cost estimate per hour
Step 4: Key Pair (Login)
This is where you'd configure SSH access (our var.key_name):
- Select "Create a new key pair" or choose existing
- Key pair name: "my-terraform-key" (matches our variable)
- Key pair type: RSA
- Private key file format: .pem (for Linux/Mac) or .ppk (for Windows/PuTTY)
- Download the key: Keep it safe, you can't download it again!
Step 5: Network Settings
This section corresponds to our VPC, subnet, and security group configuration:
VPC and Subnet:
- VPC: You'll see a dropdown - select "Default VPC"
- This is what
data.aws_vpc.defaultfinds in Terraform - Usually shows as "vpc-XXXXXXXX (default)"
- This is what
- Subnet: Select "No preference" or choose a specific AZ
- For us-east-1a: Would show "subnet-XXXXXXXX | us-east-1a"
- This is what
data.aws_subnet.defaultqueries in Terraform
Auto-assign Public IP:
- Set to "Enable" (allows internet access)
- This gives your instance a public IP address
Firewall (Security Groups):
- Select: "Create security group" (or use existing)
- Security group name: "terraform-lab-sg"
- Description: "Security group for Terraform lab EC2 instance"
Add Security Group Rules:
This matches our security.tf file:
-
SSH Rule (Port 22):
- Type: SSH
- Protocol: TCP
- Port range: 22
- Source: 0.0.0.0/0 (Anywhere IPv4) - ⚠️ Not recommended for production!
- Description: "SSH access"
-
HTTP Rule (Port 80):
- Click "Add security group rule"
- Type: HTTP
- Protocol: TCP
- Port range: 80
- Source: 0.0.0.0/0 (Anywhere IPv4)
- Description: "HTTP access"
Outbound Rules:
- Default: All traffic allowed to 0.0.0.0/0 (our egress rule in Terraform)
Step 6: Configure Storage
- Default: 8 GiB gp2 (General Purpose SSD)
- Volume Type: gp2, gp3, io1, io2, etc.
- Usually, defaults are fine for testing
Step 7: Advanced Details
This is where you'd add User Data (our user_data script in ec2.tf):
- Scroll down to find "User data" text box
- Paste the bash script:
#!/bin/bash
yum update -y
yum install -y httpd
systemctl start httpd
systemctl enable httpd
echo "<h1>Hello from Terraform Lab!</h1>" > /var/www/html/index.html
echo "<p>Instance ID: $(curl -s http://169.254.169.254/latest/meta-data/instance-id)</p>" >> /var/www/html/index.html
echo "<p>Availability Zone: $(curl -s http://169.254.169.254/latest/meta-data/placement/availability-zone)</p>" >> /var/www/html/index.html
Step 8: Summary and Launch
- Review all your selections
- Click "Launch Instance"
- Wait 2-3 minutes for the instance to start
Comparing Manual Console vs Terraform
| Aspect | AWS Console (Manual) | Terraform (Code) |
|---|---|---|
| Time to deploy | 10-15 minutes (clicking through wizard) | 2 minutes (terraform apply) |
| Reproducibility | Must remember all settings, prone to errors | Perfect - same code = same infrastructure |
| Version control | No - changes not tracked | Yes - Git tracks all changes |
| Documentation | Must write separate documentation | Code is documentation |
| Multiple environments | Repeat process for dev, staging, prod | Change variables, run apply |
| Cleanup | Manually delete each resource | terraform destroy (deletes everything) |
| Team collaboration | Difficult - no shared state | Easy - shared state, code review |
| Learning curve | Easy to start, UI-guided | Steeper initial learning, powerful later |
✅ Best Practice: Use the AWS Console to explore and learn AWS services. Once you understand what you're building, use Terraform to manage it in production. The console is great for learning; Terraform is great for operating.
Verifying Instance Details in AWS Console
After Terraform creates your instance (in Part 3), you can verify everything in the console:
View Your EC2 Instance:
- Go to EC2 Dashboard
- Click "Instances" in the left sidebar
- You'll see your instance listed
Instance Details to Check:
- Instance ID: Matches
aws_instance.terraform_instance.id - Instance Type: t2.micro (from
var.instance_type) - AMI ID: The actual AMI Terraform selected
- VPC: Default VPC ID
- Subnet: Which AZ it's in (us-east-1a)
- Security Groups: terraform-lab-sg-XXXXXX
- Public IPv4: Matches Terraform output
- Tags: Name, Environment, CreatedBy (from our tags blocks)
View Security Group:
- Click "Security Groups" in the left sidebar
- Find "terraform-lab-sg-XXXXXX"
- Click on it and check the "Inbound rules" and "Outbound rules" tabs
- Verify they match our security.tf configuration
This hands-on verification helps you understand the relationship between Terraform code and actual AWS resources!
Variable 2: instance_type
variable "instance_type" {
    description = "EC2 instance type"
    type = string
    default = "t2.micro"
}
What is an EC2 instance type?
An instance type determines the hardware characteristics of your virtual server:
- CPU cores and speed
- Memory (RAM)
- Network performance
- Storage type and capacity
- Cost per hour
Understanding EC2 Instance Types
EC2 instance types follow a naming pattern: Family + Generation + Size
Example: t2.micro
- t: T-series family (burstable performance)
- 2: Second generation
- micro: Size (smallest in the family)
Common Instance Families:
| Family | Purpose | Examples | Best For |
|---|---|---|---|
| T (T2, T3, T4g) | Burstable | t2.micro, t3.small | Development, low-traffic websites |
| M (M5, M6i) | General purpose | m5.large, m6i.xlarge | Balanced applications, web servers |
| C (C5, C6i) | Compute optimized | c5.large, c6i.2xlarge | CPU-intensive tasks, batch processing |
| R (R5, R6i) | Memory optimized | r5.large, r6i.xlarge | Databases, in-memory caches |
T2.micro Specifications (our choice):
- 1 vCPU (shared, burstable)
- 1 GB RAM
- EBS storage only
- Low to moderate network performance
- Cost: Free tier eligible (750 hours/month for first year)
✅ Free Tier Tip: t2.micro is perfect for learning because it's included in AWS free tier. You can run one t2.micro instance 24/7 for a year without charges (within free tier limits).
Variable 3: key_name
variable "key_name" {
    description = "AWS key pair name for EC2 access"
    type = string
    default = "my-terraform-key"
}
What is an AWS Key Pair?
A key pair consists of:
- Private key: Stored on your computer (like
my-key.pem) - Public key: Stored in AWS
These keys allow SSH access to your EC2 instances securely without passwords.
For this tutorial: We're not actually using key-based SSH access, so this variable isn't critical. In production, you would:
- Create a key pair in AWS Console
- Download the private key file
- Reference the key pair name in Terraform
- Use the private key to SSH into instances
Variable 4: environment
variable "environment" {
    description = "Environment name"
    type = string
    default = "dev"
}
Purpose: Tags resources with the environment (dev, staging, prod) for:
- Cost tracking and allocation
- Access control and security policies
- Visual identification in AWS Console
- Automated tooling and processes
Creating data.tf: Querying AWS Resources
Data sources allow Terraform to query information about existing resources that aren't managed by Terraform. This is crucial because some resources (like default VPCs or AMI images) already exist in your AWS account.
Create the file:
touch data.tf
Add the following content:
data "aws_ami" "amazon_linux" {
    most_recent = true
    owners = ["amazon"]

    filter {
        name = "name"
        values = ["amzn2-ami-hvm-*-x86_64-gp2"]
    }

    filter {
        name = "virtualization-type"
        values = ["hvm"]
    }
}


data "aws_vpc" "default" {
    default = true
}


data "aws_subnet" "default" {
    vpc_id = data.aws_vpc.default.id
    availability_zone = "${var.aws_region}a"
    default_for_az = true
}
Data Source 1: Amazon Machine Image (AMI)
data "aws_ami" "amazon_linux" {
    most_recent = true
    owners = ["amazon"]

    filter {
        name = "name"
        values = ["amzn2-ami-hvm-*-x86_64-gp2"]
    }

    filter {
        name = "virtualization-type"
        values = ["hvm"]
    }
}
Understanding AMIs (Amazon Machine Images)
An AMI is a template for creating EC2 instances, containing:
- Operating system (Linux, Windows, etc.)
- Pre-installed software and configurations
- Launch permissions and settings
- Storage mapping
Think of an AMI as a "stamp" or "template" for creating servers with identical configurations.
Line-by-Line Breakdown:
| Line | Code | Explanation |
|---|---|---|
| 1 | data "aws_ami" "amazon_linux" | Query AWS for an AMI, name it "amazon_linux" locally |
| 2 | most_recent = true | If multiple AMIs match, get the newest one |
| 3 | owners = ["amazon"] | Only search AMIs published by Amazon (trusted) |
| 5-8 | filter { name = "name" ... } | Search for names matching pattern |
| 10-13 | filter { name = "virtualization-type" ... } | Ensure HVM virtualization (modern standard) |
Understanding the name pattern: amzn2-ami-hvm-*-x86_64-gp2
amzn2: Amazon Linux 2 (free, optimized for AWS)ami: Amazon Machine Imagehvm: Hardware Virtual Machine (virtualization type)*: Wildcard (matches any date/version)x86_64: 64-bit Intel/AMD architecturegp2: General Purpose SSD storage
Why query instead of hard-coding?
- AMIs are updated regularly for security patches
- AMI IDs differ by region
- This always gets the latest secure version automatically
Data Source 2: Default VPC
data "aws_vpc" "default" {
    default = true
}
Understanding VPC (Virtual Private Cloud)
A VPC is your own private network within AWS, completely isolated from other AWS customers. Think of it as your own data center in the cloud.
VPC Components:
| Component | Purpose | Analogy |
|---|---|---|
| VPC | Private network space | Your office building |
| Subnets | Network segments within VPC | Floors in the building |
| Route Tables | Traffic routing rules | Building directory/maps |
| Internet Gateway | Connect to internet | Building's main entrance |
| Security Groups | Firewall rules | Security guards at doors |
Default VPC:
- AWS creates one automatically in each region
- Pre-configured with internet access
- Has default subnets in each availability zone
- Perfect for learning and simple projects
- Production usually creates custom VPCs for better control
This data source:
- Finds your default VPC
default = truemeans "find the VPC marked as default"- We'll reference it as
data.aws_vpc.default.idelsewhere
Data Source 3: Default Subnet
data "aws_subnet" "default" {
    vpc_id = data.aws_vpc.default.id
    availability_zone = "${var.aws_region}a"
    default_for_az = true
}
Understanding Subnets and Availability Zones
Subnets: Subdivisions of a VPC's IP address range
- Isolate resources logically
- Each subnet exists in one availability zone
- Can be public (internet-accessible) or private (internal only)
Availability Zones (AZs): Physically separate data centers within a region
- Isolated from failures in other AZs
- Connected with low-latency networking
- Naming: region code + letter (
us-east-1a,us-east-1b, etc.)
Line-by-Line Breakdown:
| Line | Code | Explanation |
|---|---|---|
| 1 | data "aws_subnet" "default" | Query for a subnet |
| 2 | vpc_id = data.aws_vpc.default.id | Look in our default VPC (references previous data source) |
| 3 | availability_zone = "${var.aws_region}a" | In the "a" AZ of our region (us-east-1a) |
| 4 | default_for_az = true | Find the default subnet for this AZ |
String interpolation: "\${var.aws_region}a"
\${}inserts variable values into strings- If
var.aws_regionis "us-east-1", result is "us-east-1a" - Dynamically constructs AZ names based on chosen region
💡 Why these data sources?: We're using existing AWS infrastructure (default VPC and subnet) instead of creating our own. This is simpler for learning. Production environments typically create custom VPCs with specific network architecture.
Creating security.tf: Firewall Rules
Security groups act as virtual firewalls controlling inbound and outbound traffic to AWS resources. This is critical for protecting your infrastructure.
Create the file:
touch security.tf
Add the following content:
# Create security group for EC2 instance
resource "aws_security_group" "terraform_sg" {
    name_prefix = "terraform-lab-sg-"
    description = "Security group for Terraform lab EC2 instance"
    vpc_id      = data.aws_vpc.default.id

  # Allow SSH access
    ingress {
        description = "SSH"
        from_port   = 22
        to_port     = 22
        protocol    = "tcp"
        cidr_blocks = ["0.0.0.0/0"]
    }

    # Allow HTTP access
    ingress {
        description = "HTTP"
        from_port   = 80
        to_port     = 80
        protocol    = "tcp"
        cidr_blocks = ["0.0.0.0/0"]
    }

    # Allow all outbound traffic
    egress {
        from_port   = 0
        to_port     = 0
        protocol    = "-1"
        cidr_blocks = ["0.0.0.0/0"]
    }

    tags = {
        Name        = "terraform-lab-sg"
        Environment = var.environment
        CreatedBy   = "Terraform"
    }
}
Understanding Security Groups
Security groups control network access using rules:
- Ingress rules: Inbound traffic (requests coming TO your instance)
- Egress rules: Outbound traffic (requests going FROM your instance)
- Stateful: If traffic is allowed in, response is automatically allowed out
Security group behavior:
- Default: All inbound blocked, all outbound allowed
- Rules are additive (you can only allow, not deny)
- Changes apply immediately
- Multiple security groups can be attached to one instance
Resource Block Breakdown
Line 2-5: Resource Declaration
resource "aws_security_group" "terraform_sg" {
    name_prefix = "terraform-lab-sg-"
    description = "Security group for Terraform lab EC2 instance"
    vpc_id      = data.aws_vpc.default.id
| Attribute | Value | Explanation |
|---|---|---|
resource | Keyword | Declares we're creating a resource |
"aws_security_group" | Resource type | What kind of AWS resource |
"terraform_sg" | Local name | How we reference it in Terraform |
name_prefix | "terraform-lab-sg-" | AWS adds unique suffix to prevent conflicts |
description | Text | Visible in AWS Console, helps identify purpose |
vpc_id | Reference to VPC | Security groups belong to a specific VPC |
Ingress Rule 1: SSH Access
ingress {
    description = "SSH"
    from_port   = 22
    to_port     = 22
    protocol    = "tcp"
    cidr_blocks = ["0.0.0.0/0"]
}
What this rule does: Allows SSH connections to the server
| Attribute | Value | Meaning |
|---|---|---|
from_port | 22 | Starting port number in range |
to_port | 22 | Ending port (same = only port 22) |
protocol | "tcp" | Transmission Control Protocol (reliable) |
cidr_blocks | ["0.0.0.0/0"] | Allow from any IP address (anywhere) |
Understanding CIDR blocks:
0.0.0.0/0: Represents all possible IPv4 addresses/0means "match any IP"- More specific example:
192.168.1.0/24matches 192.168.1.0 through 192.168.1.255
⚠️ Security Warning: 0.0.0.0/0 allows connections from anywhere on the internet. For production, restrict to specific IP addresses or ranges. For example:
- Your office:
"203.0.113.0/24" - Your home:
"198.51.100.25/32" - VPN:
"192.0.2.0/24"
Ingress Rule 2: HTTP Access
ingress {
    description = "HTTP"
    from_port   = 80
    to_port     = 80
    protocol    = "tcp"
    cidr_blocks = ["0.0.0.0/0"]
}
What this rule does: Allows web traffic to your server
- Port 80: Standard HTTP (unencrypted web traffic)
- Public access: Websites need to be accessible from anywhere
- In production, you'd also add port 443 for HTTPS (encrypted)
Egress Rule: Outbound Traffic
egress {
    from_port   = 0
    to_port     = 0
    protocol    = "-1"
    cidr_blocks = ["0.0.0.0/0"]
}
What this rule does: Allows all outbound connections
| Attribute | Value | Meaning |
|---|---|---|
from_port | 0 | All ports (0 is wildcard) |
to_port | 0 | All ports |
protocol | "-1" | All protocols (TCP, UDP, ICMP, etc.) |
cidr_blocks | ["0.0.0.0/0"] | To anywhere |
Why allow all outbound:
- Instance needs to download packages and updates
- Applications need to make API calls
- Standard practice for most workloads
- Can be restricted in high-security environments
Resource Tags
tags = {
    Name        = "terraform-lab-sg"
    Environment = var.environment
    CreatedBy   = "Terraform"
}
Why tags matter:
- Organization: Group resources logically
- Cost tracking: See spending by environment, project, etc.
- Automation: Scripts can find resources by tags
- Compliance: Required by many organizations
Creating ec2.tf: The EC2 Instance
Now for the main attraction—creating the actual EC2 instance that will run our web server!
Create the file:
touch ec2.tf
Add the following content:
# Create EC2 instance
resource "aws_instance" "terraform_instance" {
  ami                    = data.aws_ami.amazon_linux.id
  instance_type          = var.instance_type
  subnet_id              = data.aws_subnet.default.id
  vpc_security_group_ids = [aws_security_group.terraform_sg.id]

  # User data script to install and start Apache
  user_data = <<-EOF
                #!/bin/bash
                yum update -y
                yum install -y httpd
                systemctl start httpd
                systemctl enable httpd
                echo "<h1>Hello from Terraform Lab!</h1>" > /var/www/html/index.html
                echo "<p>Instance ID: $(curl -s http://169.254.169.254/latest/meta-data/instance-id)</p>" >> /var/www/html/index.html
                echo "<p>Availability Zone: $(curl -s http://169.254.169.254/latest/meta-data/placement/availability-zone)</p>" >> /var/www/html/index.html
                EOF

  tags = {
    Name        = "terraform-lab-instance"
    Environment = var.environment
    CreatedBy   = "Terraform"
  }
}
Understanding EC2 Instance Resource
This block creates a virtual machine in AWS. Let's break down every attribute:
| Attribute | Value | Purpose |
|---|---|---|
ami | data.aws_ami.amazon_linux.id | Which OS/image to use (from data source) |
instance_type | var.instance_type | Hardware size (t2.micro from variable) |
subnet_id | data.aws_subnet.default.id | Which network subnet to place instance in |
vpc_security_group_ids | [aws_security_group.terraform_sg.id] | Which security group(s) control access |
user_data | Bash script | Commands to run when instance first starts |
Understanding User Data Scripts
User data is a powerful feature that lets you run scripts automatically when an EC2 instance launches. It's executed as root during the first boot.
Our user data script breakdown:
#!/bin/bash
yum update -y
- Purpose: Updates all installed packages to latest versions
- Why: Security patches and bug fixes
-y: Automatically answers "yes" to all prompts
yum install -y httpd
- httpd: Apache HTTP Server (web server software)
- Why: We're creating a web server to demonstrate the instance works
- Result: Installs Apache and all its dependencies
systemctl start httpd
systemctl enable httpd
start httpd: Starts Apache immediatelyenable httpd: Configures Apache to start automatically after reboot- systemctl: Linux service management command
echo "<h1>Hello from Terraform Lab!</h1>" > /var/www/html/index.html
- Creates a simple HTML page
>: Overwrites the file (creates if doesn't exist)/var/www/html/index.html: Apache's default document root
echo "<p>Instance ID: $(curl -s http://169.254.169.254/latest/meta-data/instance-id)</p>" >> /var/www/html/index.html
>>: Appends to the file (doesn't overwrite)$(...): Command substitution (runs command, inserts output)curl -s: Silently fetches data169.254.169.254: EC2 metadata service (special IP)- Retrieves the instance's unique ID
EC2 Metadata Service
The metadata service is a special endpoint available only from within EC2 instances:
- IP address:
169.254.169.254 - Provides instance information (ID, region, AZ, etc.)
- No authentication required
- Only accessible from the instance itself (not from internet)
| Metadata Endpoint | Returns |
|---|---|
/latest/meta-data/instance-id | Instance ID (e.g., i-0afea07377a6c62ff) |
/latest/meta-data/placement/availability-zone | Availability zone (e.g., us-east-1a) |
/latest/meta-data/public-ipv4 | Public IP address |
/latest/meta-data/hostname | Internal hostname |
Creating outputs.tf: Exposing Important Values
Outputs display values after Terraform completes, making it easy to find important information like IP addresses and DNS names.
Create the file:
touch outputs.tf
Add the following content:
# Output values
output "instance_id" {
    description = "ID of the EC2 instance"
    value       = aws_instance.terraform_instance.id
}

output "instance_public_ip" {
    description = "Public IP address of the EC2 instance"
    value       = aws_instance.terraform_instance.public_ip
}

output "instance_public_dns" {
    description = "Public DNS name of the EC2 instance"
    value       = aws_instance.terraform_instance.public_dns
}

output "security_group_id" {
    description = "ID of the security group"
    value       = aws_security_group.terraform_sg.id
}

output "website_url" {
    description = "URL to access the web server"
    value       = "http://${aws_instance.terraform_instance.public_ip}"
}
Understanding Output Blocks
Outputs serve multiple purposes:
- Display important values after
terraform apply - Can be queried with
terraform output - Used by other Terraform configurations (modules)
- Helpful for automation scripts
Output block structure:
output "name" {
    description = "What this output represents"
    value       = actual_value_to_output
}
Understanding Public IP vs. DNS
| Type | Example | Use Case |
|---|---|---|
| Public IP | 3.92.197.145 | Direct access, SSH, testing |
| Public DNS | ec2-3-92-197-145.compute-1.amazonaws.com | More stable, works if IP changes |
Why both?
- Public IP: Simple, direct, but can change if instance stops/starts
- Public DNS: Hostname that resolves to the IP, slightly more stable
- Both work for accessing your web server
Private IP vs. Public IP:
- Private IP: Only accessible within the VPC (internal communication)
- Public IP: Accessible from internet (external communication)
- Our instance gets both automatically
✅ Configuration Complete! You now have all six Terraform files created:
main.tf: Core Terraform and provider configurationvariables.tf: Flexible, reusable variable definitionsdata.tf: Queries for existing AWS resourcessecurity.tf: Network security and firewall rulesec2.tf: The actual EC2 instance with web serveroutputs.tf: Important values displayed after deployment
In Part 3, we'll bring this to life by running Terraform commands!
Configuration Files Summary
Let's review how all these files work together:
| File | What It Defines | Dependencies |
|---|---|---|
main.tf | Terraform version, AWS provider | Uses variables.tf |
variables.tf | Input variables with defaults | None (provides values to others) |
data.tf | Queries for AMI, VPC, Subnet | Uses variables.tf |
security.tf | Security group and rules | Uses data.tf (VPC), variables.tf |
ec2.tf | EC2 instance with web server | Uses everything (AMI, subnet, security group, variables) |
outputs.tf | Values to display after creation | References ec2.tf and security.tf |
The Dependency Graph
Terraform automatically determines the order to create resources based on dependencies:
variables.tf
    ↓
main.tf (configures AWS provider)
    ↓
data.tf (queries AWS)
    ↓
security.tf (creates security group)
    ↓
ec2.tf (creates instance with security group)
    ↓
outputs.tf (displays results)
Best Practices Summary
Configuration Organization
| Practice | Why It Matters |
|---|---|
| Separate files by purpose | Easier to find and modify specific configurations |
| Use variables, not hard-coded values | Reusable across environments, easier to change |
| Add descriptions to all variables and outputs | Self-documenting code, helps team members |
| Use data sources for existing resources | Avoid recreating infrastructure, leverage what exists |
| Tag all resources consistently | Cost tracking, automation, organization |
| Use comments for complex logic | Future you (and team) will thank you |
Security Best Practices
| Practice | Why It Matters |
|---|---|
| Never hard-code credentials | Security risk, credential leak possibility |
| Restrict security group rules | 0.0.0.0/0 is convenient but insecure for production |
| Use latest AMIs | Security patches and bug fixes |
| Enable HTTPS in production | Encrypted traffic protects user data |
| Use key pairs for SSH access | More secure than passwords |
HCL Syntax Reference
Basic Syntax Elements
| Element | Syntax | Example |
|---|---|---|
| Blocks | type "label" { ... } | resource "aws_instance" "web" { ... } |
| Attributes | key = value | instance_type = "t2.micro" |
| Comments | # single line | # This is a comment |
| Variables | var.name | var.aws_region |
| Resources | resource.name.attribute | aws_instance.web.id |
| Data Sources | data.type.name.attribute | data.aws_ami.amazon_linux.id |
| Interpolation | "${expression}" | "${var.region}a" |
| Lists | [item1, item2] | ["0.0.0.0/0"] |
| Maps | {key = value} | {Name = "web"} |
Configuration Cheat Sheet
Quick Reference: All Files
# Create all files at once
touch main.tf variables.tf data.tf security.tf ec2.tf outputs.tf

# Typical file sizes (lines of code)
main.tf       # ~15 lines
variables.tf  # ~25 lines
data.tf       # ~30 lines
security.tf   # ~40 lines
ec2.tf        # ~30 lines
outputs.tf    # ~25 lines
Common Patterns
Referencing a variable:
region = var.aws_region
Referencing a data source:
ami = data.aws_ami.amazon_linux.id
Referencing a resource:
vpc_security_group_ids = [aws_security_group.terraform_sg.id]
String interpolation:
name = "\${var.environment}-server"
Heredoc for multi-line strings:
user_data = <<-EOF
    #!/bin/bash
    echo "Hello World"
    EOF
What's Next?
Continue Your Terraform Journey
In Part 3: Terraform Workflow and State Management, you'll discover:
- terraform init: Initializing and understanding the .terraform directory
- terraform validate: Checking configuration syntax
- terraform fmt: Formatting code consistently
- terraform plan: Previewing infrastructure changes in detail
- terraform apply: Creating real AWS infrastructure
- terraform show: Inspecting created resources
- terraform state: Understanding state management
- terraform output: Querying output values
- terraform destroy: Safely removing infrastructure
- Modifying infrastructure and applying changes
- Understanding the state file and why it's critical
- Best practices for state management
- Troubleshooting common issues
Recommended Practice
Before Part 3, review your configuration files:
- Read through each file and understand every line
- Try modifying variable defaults (change region or instance type)
- Add additional tags to resources
- Read AWS documentation about EC2, VPC, and security groups
- Draw a diagram of how your resources connect
🎉 Fantastic Progress! You've completed Part 2 and now have a complete, working Terraform configuration.
You understand:
- Every Terraform configuration file and its purpose
- Core AWS concepts: EC2, VPC, AMI, security groups, subnets
- HCL syntax and how resources reference each other
- Variables, data sources, resources, and outputs
- Security groups, ingress/egress rules, and CIDR blocks
- User data scripts and EC2 metadata service
Ready to deploy? Part 3 will walk you through every Terraform command to bring your infrastructure to life on AWS!
Part 2 of 3 in the Terraform Hands-On series. Continue with Part 3 to execute your Terraform configuration and manage infrastructure lifecycle.
